

I’ve spent more hours than I’d like to admit keeping our NDES server alive. Patching IIS, renewing the Intune Certificate Connector, troubleshooting SCEP failures that turn out to be “the connector service restarted and forgot how to talk to the CA.” Classic.
So when Microsoft shipped Cloud PKI as part of the Intune Suite, I was curious. Could it actually replace that entire pipeline? And more importantly, could I anchor it to my existing on-prem root CA instead of building a whole new trust hierarchy?
Turns out: yes, and it took (less than) 30 minutes in total.
What We’re Building
Cloud PKI supports two deployment models. You can spin up a completely cloud-hosted two-tier hierarchy (new root + new issuing CA), or you can use the BYOCA model to create a cloud-hosted issuing CA that chains to your existing on-prem root.
BYOCA is the interesting one for shops that already have an ADCS root CA. Your existing trust chain stays intact. Devices that already trust your root CA will automatically trust certificates issued by the cloud issuing CA. No new root to distribute.
Here’s what the hierarchy looks like:
CORE-HAWKWEAVE (on-prem Enterprise Root CA, HW-CA01)
  └── Hawkweave Cloud PKI Issuing CA (cloud-hosted in Intune)
        └── Built-in SCEP service
              └── Leaf certificates → Entra-joined devices
The built-in SCEP service is the part that replaces NDES. No server to maintain, no Intune Certificate Connector to install, no IIS or NDES role to nurse back to health every other Tuesday (Patch and Destroy…)
What You Need Before You Start
A few things need to be in place before the Cloud PKI wizard will do anything useful.
Licensing.If you have Microsoft 365 E5, good news: Microsoft announced in December 2025 that Cloud PKI is being bundled into your license alongside Endpoint Privilege Management and Enterprise Application Management. The rollout is happening throughout 2026 ahead of the July 1, 2026 price increase ($3/user/month on E5). You’ll get a 30-day heads-up in the M365 admin center before it goes live in your tenant. If you’re on E3 or lower, you’ll still need the Intune Suite add-on or the standalone Cloud PKI add-on. A trial is available in the Intune admin center under Tenant administration > Intune add-ons.
On-prem root CA. Your ADCS root CA needs to be running and accessible. You’ll be signing a CSR on it, so you need admin access to the CA or at minimum the ability to submit certificate requests.
SubCA template published. The Subordinate Certification Authority template must be available on your signing CA. Check with certutil -CATemplates on the CA server. If it’s not listed, publish it from the Certificate Templates folder in certsrv.msc.
Entra-joined test device. The device needs to be MDM-enrolled in Intune (not just Entra-registered). Run dsregcmd /status and confirm AzureAdJoined: YES and that the MDMUrl field is populated.
Step 1: Create the BYOCA Issuing CA
Sign in to the Intune admin center and go to Tenant administration > Cloud PKI > Create.
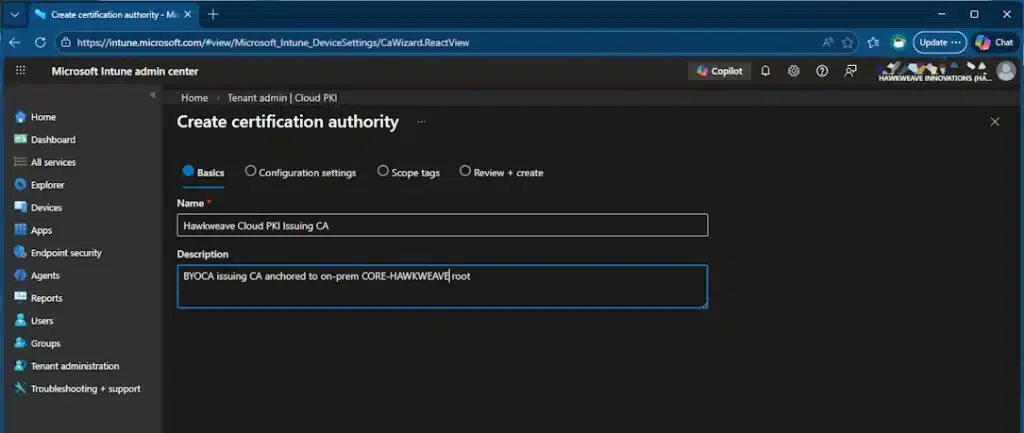
For the basics, give it a name you’ll recognize. I used “Hawkweave Cloud PKI Issuing CA.”
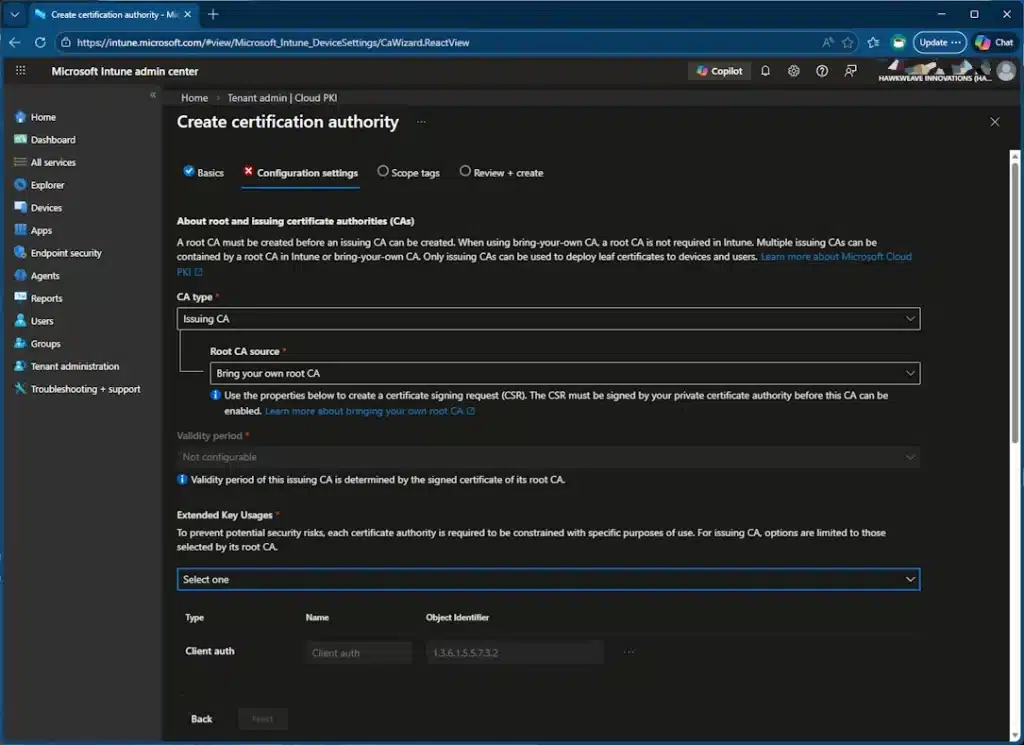
On the configuration page, set:
- CA type: Issuing CA
- Root CA source: Bring your own root CA
- Extended Key Usages: Client Authentication
- Common Name: Whatever describes this CA’s purpose
- Country: Your two-letter country code
- Key size: RSA-2048
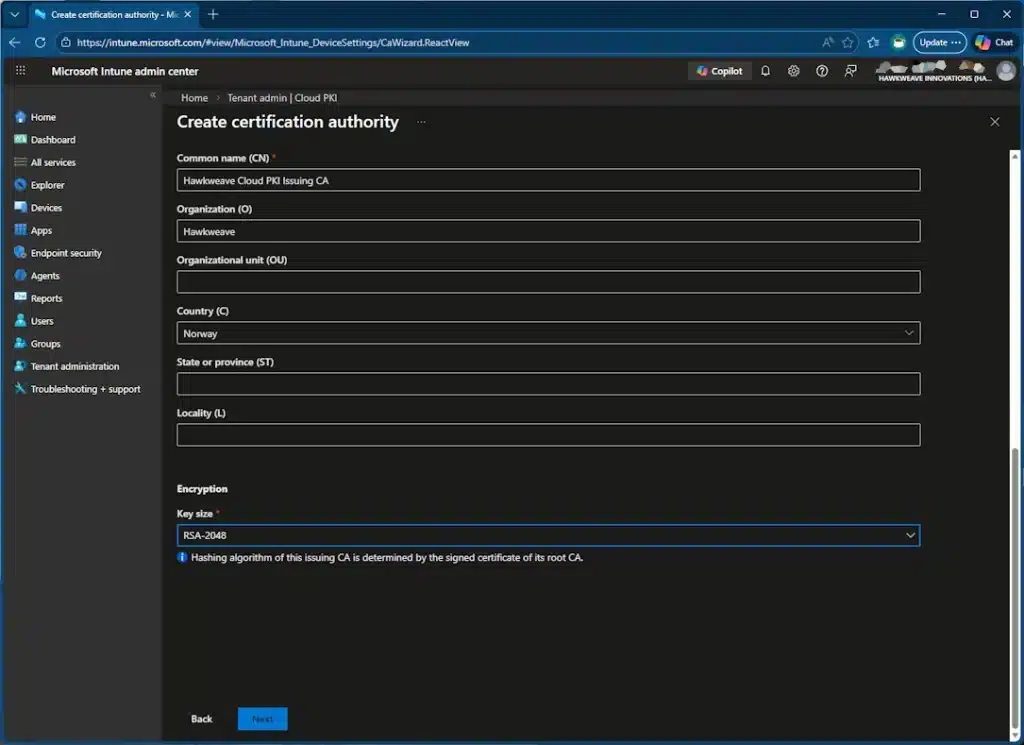
A word of warning: none of these settings can be changed after creation. If you pick the wrong EKU or key size, you’ll need to create a new CA. And each CA counts toward a limit of 6 per tenant.
Hit Create.
Step 2: Download and Sign the CSR
After creation, the CA shows a status of “Signing required.” Go to Properties and download the CSR file (it’s a .req).
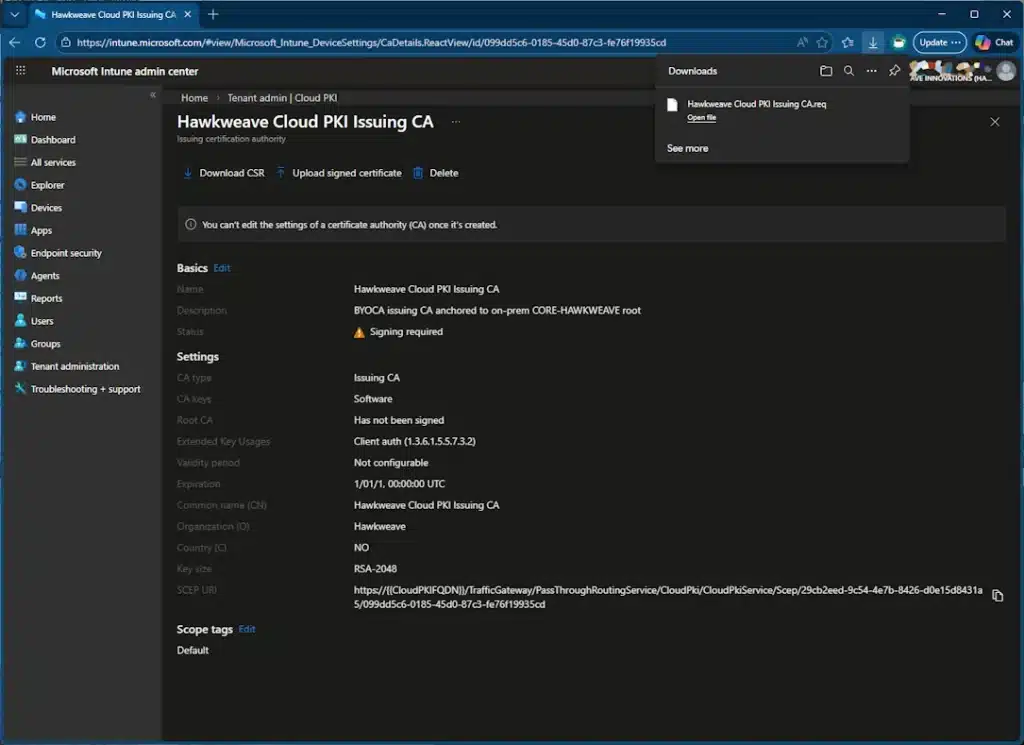
Now comes the on-prem part. Copy that .req file to your CA server. You have two options for signing: the certreq command line tool or the Certification Authority MMC console. I’ll just show the command line version here.
Submit the CSR
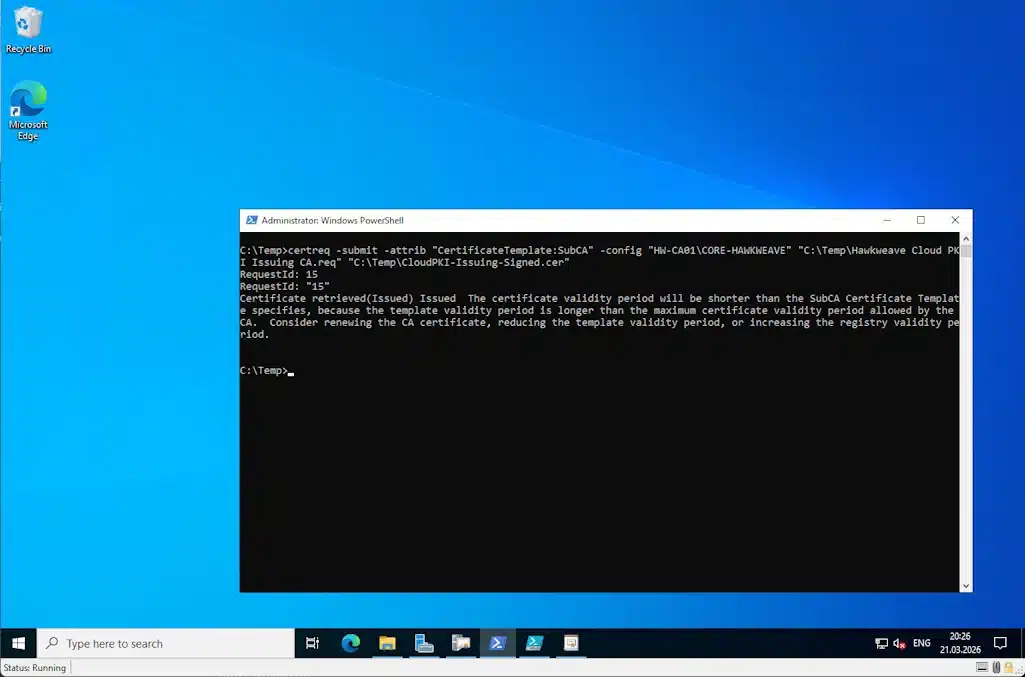
The quickest way to get the request onto the CA is certreq:
certreq -submit `
    -attrib "CertificateTemplate:SubCA" `
    -config "HW-CA01\CORE-HAWKWEAVE" `
    'C:\Temp\Hawkweave Cloud PKI Issuing CA.req' `
    'C:\Temp\CloudPKI-Issuing-Signed.cer'
Check the result
In my lab, the request was auto-issued. certreq came back with Certificate retrieved(Issued) and wrote the signed .cer directly to the output path. No trip to Pending Requests, no manual approval. It also spit out a .rsp file, which you don’t need.
You’ll also see a warning about the validity period being shorter than the template specifies. That’s cosmetic. The issuing CA cert gets truncated so it doesn’t outlive its parent root CA.
Gotcha #1: Your CA might not auto-issue. Some Enterprise Root CAs have their policy module set to require CA manager approval for subordinate CA requests. If certreq returns “certificate request is pending,” open certsrv.msc, go to Pending Requests, right-click the request, then All Tasks > Issue.
Export the chain
You also need the full chain exported as a .p7b file:
certutil -ca.chain C:\Temp\RootCA-Chain.p7b
You could also do this through the GUI:
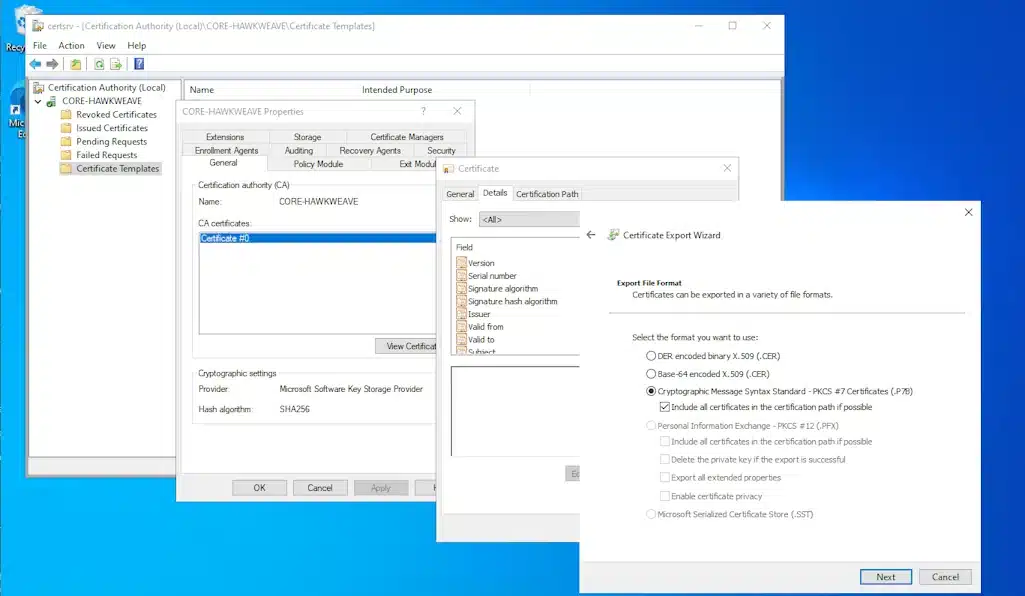
Copy both files (the signed .cer and the .p7b chain) back to whatever machine you’re using to access the Intune admin center.
Step 3: Upload and Activate
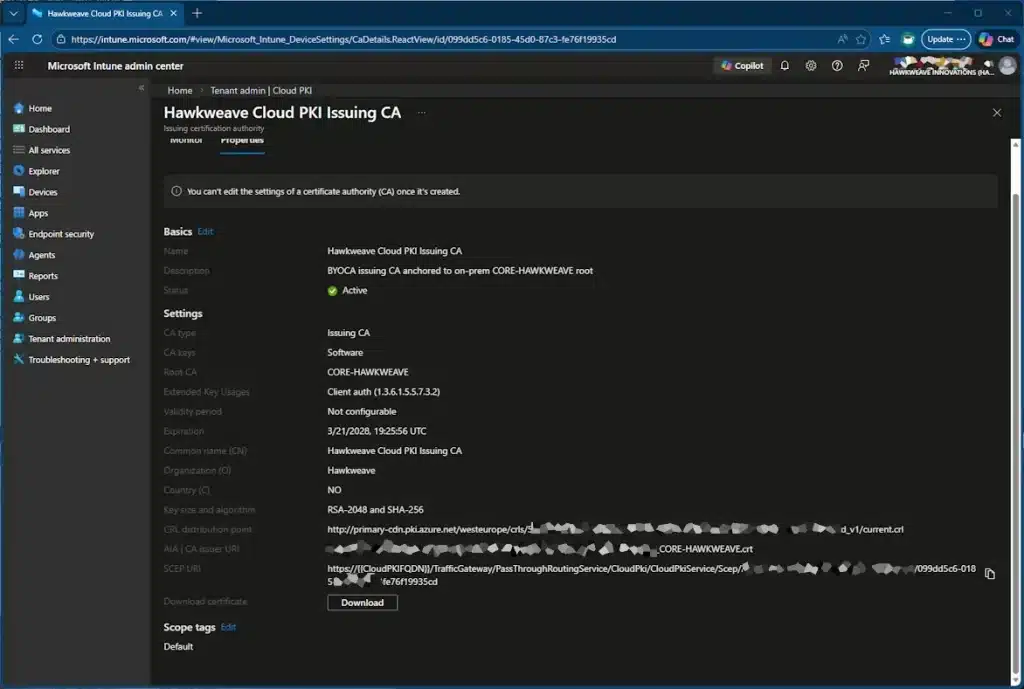
Back in the Intune admin center, select your issuing CA, go to Properties, and click Upload signed certificate.
Upload both files: the signed certificate and the chain of trust (p7b). Click Save.
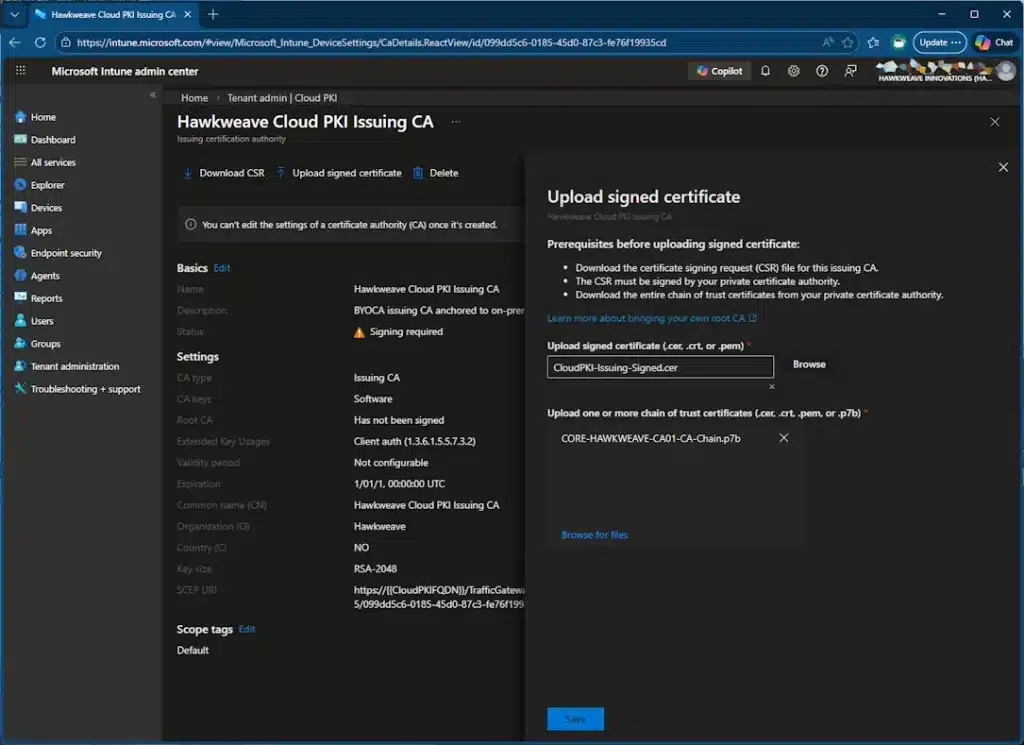
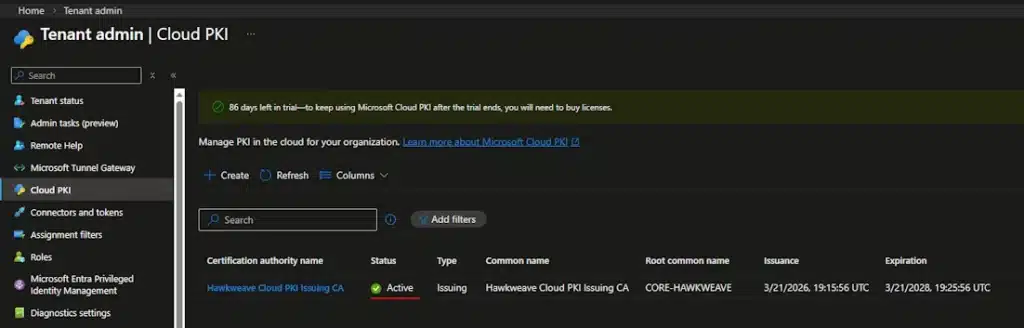
After a minute or two, refresh the CA list. Status should flip to Active. The root common name column shows “CORE-HAWKWEAVE” or whatever is your external root CA, which confirms the BYOCA anchoring worked.
While you’re on the Properties page, copy the SCEP URI. You’ll need it for the SCEP profile.
Step 4: Create the Certificate Profiles
This is where Cloud PKI starts to feel like regular Intune work. You need three profiles, though you’ll probably have the first one – the Root CA – already deployed if you’re using it for something else, like the NDES / Intune Certificate Connector for instance.
If you haven’t though, it’s an easy job:
Profile 1: Trusted Certificate (Root CA)
Go to Devices > Configuration > Create > Windows 10 and later > Templates > Trusted certificate. Upload the root CA’s public key (.cer file). Set the destination store to “Computer certificate store – Root.”
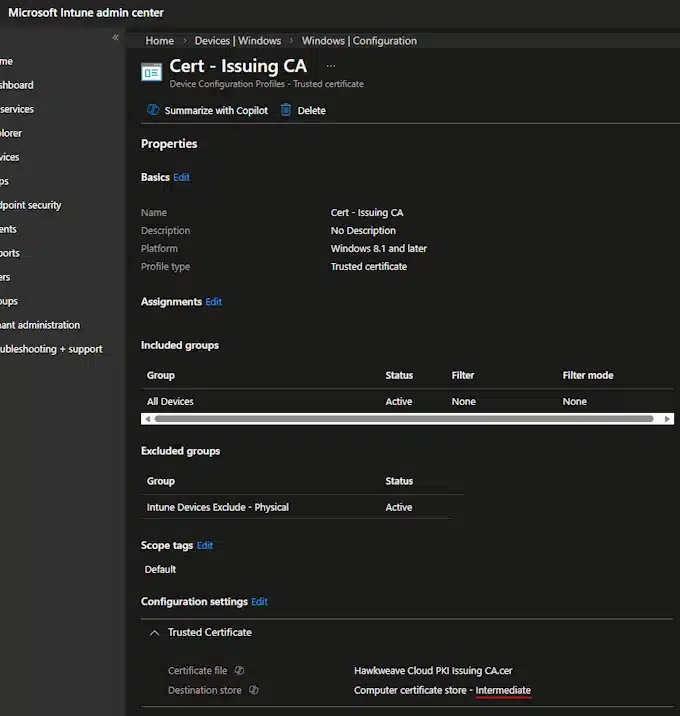
Profile 2: Trusted Certificate (Issuing CA)
Same drill, but download the issuing CA’s public key from Cloud PKI Properties. Set the destination store to “Computer certificate store – Intermediate Certification Authorities.”
Profile 3: SCEP Certificate
Create a SCEP profile. The key settings:
- Certificate type: Device (for machine certs) or User
- Subject name format:
CN=CLOUDPKI-{{DeviceName}}for device certs - Key size: 2048
- Hash algorithm: SHA-2
- Root Certificate: Link to the Intermediate CA trusted certificate profile
- Extended Key Usage: Client Authentication
- SCEP Server URLs: Paste the SCEP URI from the issuing CA

Gotcha #2: The SCEP URI contains a placeholder string, {{CloudPKIFQDN}}. Leave it alone. Intune swaps it out with the real FQDN when the profile reaches the device. If you manually replace it, enrollment fails.
Gotcha #3: Don’t mix NDES SCEP URLs with Cloud PKI SCEP URLs in the same profile. If you have an existing NDES-based SCEP profile, create a separate one for Cloud PKI.
Assign all three profiles to a group containing your test device.
Step 5: Validate
Force a sync on the test device (Settings > Accounts > Access work or school > Info > Sync), then wait 5 to 10 minutes.
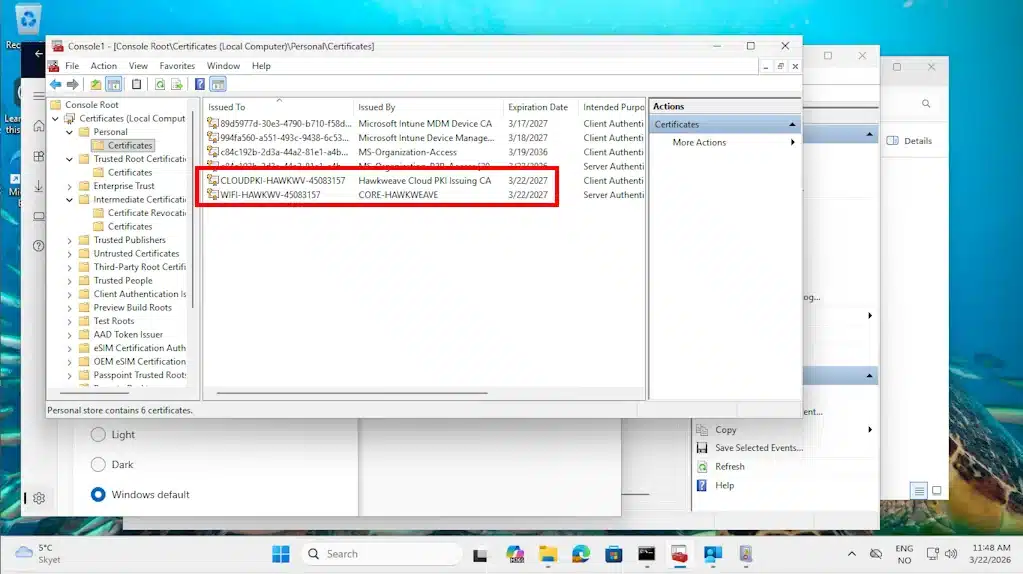
Open certlm.msc on the test device and check three locations:
- Personal > Certificates: A leaf cert issued by your Cloud PKI issuing CA should be here.
- Trusted Root Certification Authorities > Certificates: Your on-prem root CA.
- Intermediate Certification Authorities > Certificates: The Cloud PKI issuing CA.
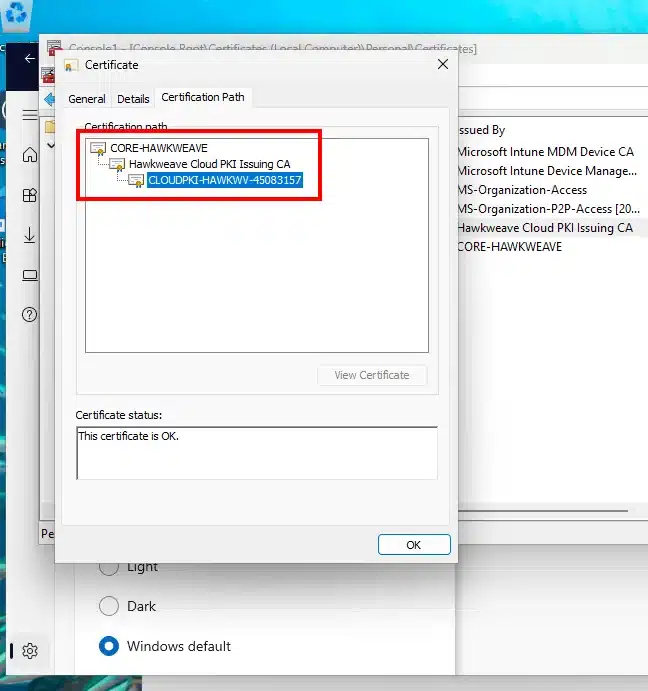
Double-click the leaf cert and go to the Certification Path tab. You should see a clean three-tier chain: root at the top, cloud issuing CA in the middle, leaf cert at the bottom.
PowerShell verification for the command-line-inclined:
# Check computer certificate store for the leaf cert
Get-ChildItem Cert:\LocalMachine\My | Where-Object {
    $_.Issuer -match "Hawkweave Cloud PKI Issuing CA"
} | Format-List Subject, Issuer, NotBefore, NotAfter, Thumbprint, HasPrivateKey

# Check root store for the root CA
Get-ChildItem Cert:\LocalMachine\Root | Where-Object {
    $_.Subject -match "CORE-HAWKWEAVE"
} | Format-List Subject, Thumbprint

# Check intermediate store for the issuing CA
Get-ChildItem Cert:\LocalMachine\CA | Where-Object {
    $_.Subject -match "Hawkweave Cloud PKI Issuing CA"
} | Format-List Subject, Thumbprint

# Validate the full chain
$leaf = Get-ChildItem Cert:\LocalMachine\My | Where-Object {
    $_.Issuer -match "Hawkweave Cloud PKI Issuing CA"
} | Select-Object -First 1
$leaf | Test-Certificate -Policy SSL
True

# Or: certutil -verify -urlfetch <exported cert path>
If the leaf cert shows up at first with HasPrivateKey: True, you’re done. The full chain should validate cleanly.
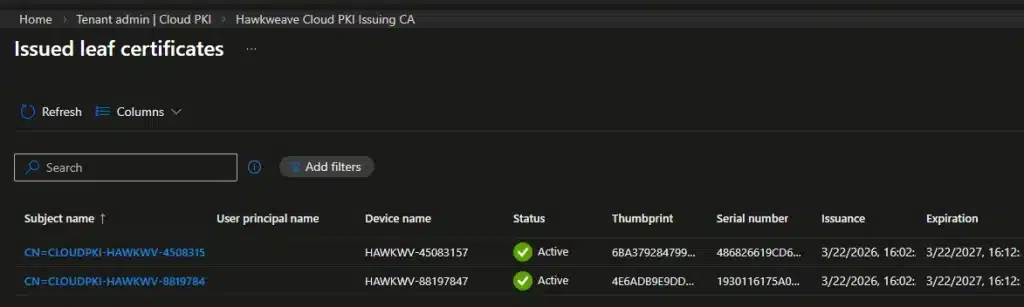
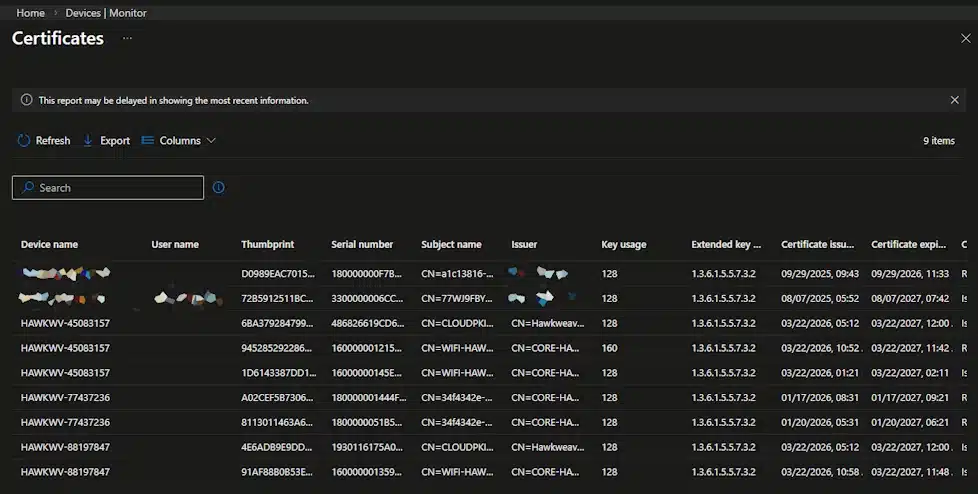
In the Intune admin center, check Devices > Monitor > Certificates for confirmation, and Tenant administration > Cloud PKI > [your CA] > View all certificates to see the issued cert.
You can also get an overview of all the issued certificates (not just through Cloud PKI) from using the Monitor tab under Devices:
Noteworthy Things
Trial CAs use software-backed keys. If you later buy a Cloud PKI license, the trial CAs keep working but the keys stay software-backed. You can’t upgrade them to HSM. If HSM matters to your compliance requirements, you’ll need to create new CAs post-purchase and redeploy everything.
CA settings are permanent. The EKU list, key size, subject attributes, all of it. Get it right the first time or burn a slot creating a replacement.
CRL is HTTP-only, no OCSP. CRLs have a 7-day validity and are republished every 3.5 days. They’re refreshed immediately on revocation, which is nice. But if your relying parties (NPS, RADIUS) need OCSP, Cloud PKI can’t do it today.
Max 6 CAs per tenant. Root CAs, issuing CAs, and BYOCA CAs all count. Plan your hierarchy before clicking Create.
Profile ordering matters. If the SCEP profile tries to enroll before the trusted certificate profiles have deployed, it fails because the device doesn’t trust the chain yet. In practice, Intune usually handles this correctly if all profiles are assigned to the same group at the same time, but it’s worth knowing.
Cloud PKI vs SCEPman vs the NDES Stack
Having run NDES and Cloud PKI side by side (and deployed SCEPman in several greenfield Intune environments), here’s my honest comparison of the three.
Cloud PKI wins on operational overhead. There’s no NDES server to patch, no Certificate Connector to update, no IIS application pool to recycle. The SCEP endpoint is hosted by Microsoft under the *.manage.microsoft.com namespace, which is already allowed through most enterprise firewalls. And with the E5 inclusion, the licensing objection is gone for a lot of shops.
The on-prem stack wins on flexibility. Certificate templates in ADCS give you fine-grained control over key usage, issuance policies, and enrollment permissions. Cloud PKI’s SCEP profile covers the common cases (client auth, Wi-Fi, VPN) but doesn’t match the template engine’s depth.
SCEPman (from Glueck Kanja) deserves a mention here because it hits a sweet spot that neither of the other two fully covers. It runs in your own Azure tenant on top of Azure Key Vault, so you get cloud-native simplicity without handing your CA to Microsoft’s infrastructure. I’ve deployed it for several greenfield Autopilot builds where there was no existing ADCS to anchor to, and the experience was consistently smooth: Azure Marketplace deployment, connect to Intune, done. It also supports OCSP (which Cloud PKI doesn’t), works with Jamf and other MDMs beyond Intune, and handles server certificates and non-MDM use cases that Cloud PKI can’t touch. The community edition covers smaller environments at no licensing cost beyond Azure consumption. For pure Intune shops already on E5, Cloud PKI is now the path of least resistance. For anything more complex, or multi-MDM, or where you want OCSP, SCEPman is the one I’d reach for first.
CRL behavior is worth calling out. Cloud PKI handles CRL automatically but doesn’t support OCSP. On-prem gives you both, but you maintain them yourself. SCEPman gives you both with minimal operational effort.
For most certificate-based Wi-Fi or VPN authentication scenarios on Intune-managed devices, and if you’re a M365 E5 shop, Cloud PKI is probably now the simplest path.
If you need something really quick and easy to setup, with advanced template policies, OCSP, and multi-MDM support, look at SCEPman. If you have existing ADCS infrastructure with complex templates that can’t be replicated elsewhere, keep the on-prem stack.
Next Steps
With a working BYOCA issuing CA, the natural next steps are:
- Create a Wi-Fi profile in Intune that references the SCEP certificate for 802.1x authentication.
- Configure NPS (or a cloud RADIUS service) to trust the root CA and validate the Cloud PKI-issued client certs.
- Roll out to a pilot group and monitor the certificate issuance reports in the Intune admin center.
That’s a post for another day.
Have questions or spotted something I got wrong? Reach out in the comments. The gotchas in this post came from actual lab testing, not documentation reading. Your mileage may vary, but probably in the same direction.